How to Make a Cookie Cutter with a 3D Printer
Custom cookie cutters are one of the most popular and practical uses of a 3D printer. They’re easy to design, fast to print, and perfect for home baking, gifts, or small businesses.
In this guide, you’ll learn the complete process of making a cookie cutter with a 3D printer - from choosing a shape to printing a finished, usable cutter.
What You Need
Before you start, make sure you have:
- A shape or image (PNG, JPG, or SVG)
- A tool to convert the shape into a 3D model (GenShapr)
- An FDM 3D printer
- Food-safe filament (PLA recommended)
- Slicing software (Bambu Studio, PrusaSlicer, Cura, etc.)
Step 1: Choose or Create a Shape
Cookie cutters start as flat outlines. Simple, closed shapes work best and produce the cleanest cuts.

Good shape guidelines
- Solid black shape on a white background
- Closed outline (no gaps)
- Rounded corners preferred
- Avoid very thin details or sharp internal angles
You can draw the shape yourself in your favorite design software (Canva, for example), find one online, or generate one with ChatGPT.
Step 2: Convert the Shape into a 3D Model
A cookie cutter is essentially:
- A thin cutting wall that presses into dough
- A thicker top edge for strength and comfort
GenShapr automates this process:
- Upload your image
- Adjust cutter height and wall thickness
- Preview the cutter in 3D
- Export a ready-to-print STL file
Step 3: Set the Correct Dimensions
Correct dimensions are critical for a functional cookie cutter.
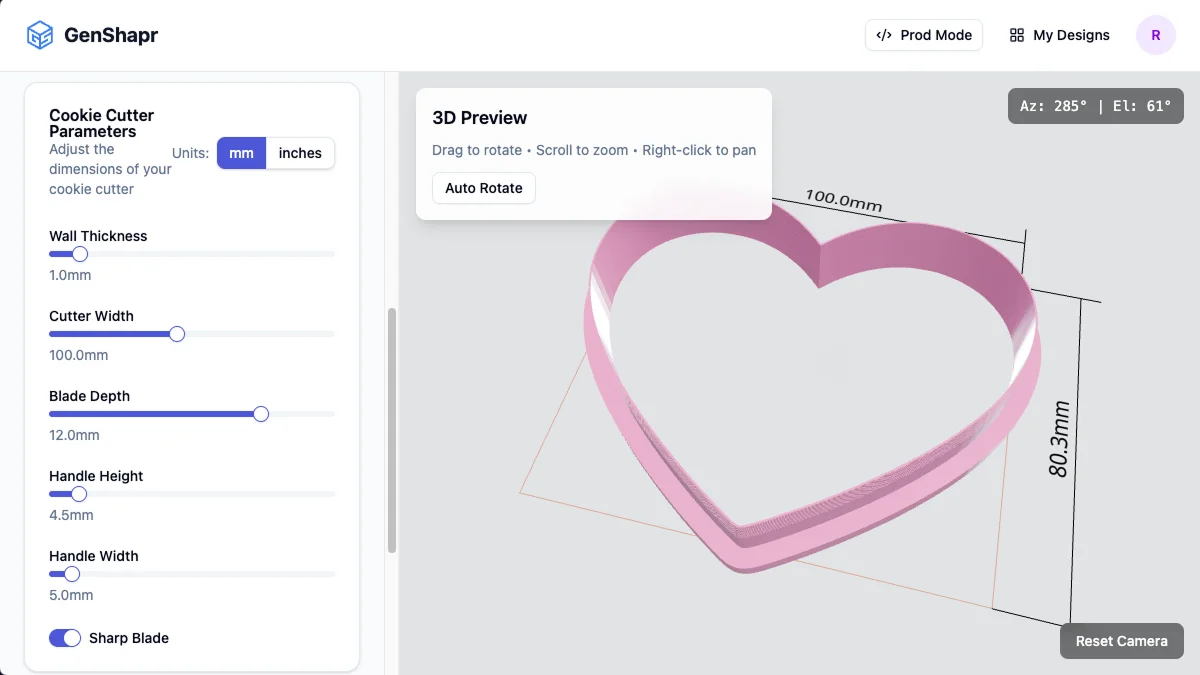
Recommended dimensions
| Parameter | Value |
|---|---|
| Cutting wall thickness | 0.8 – 1.2 mm |
| Blade depth | 12 – 15 mm |
| Top edge thickness | 2 – 3 mm |
Too thin, and the cutter may bend or break. Too thick, and it won’t cut dough cleanly. Feel free to experiment to match your dough and your printer.
Step 4: Choose the Right Filament
For most home bakers, PLA is the best option.
Recommended
- PLA or PLA+
- Light or natural colors
- Matte finish
Avoid
- ABS (warping and fumes)
- Very flexible filaments
- Dark colors (harder to inspect cleanliness)
Note on food safety: 3D printed objects have layer lines that can trap bacteria. Cookie cutters are generally safe when used with dough, washed by hand, and replaced periodically.
Step 5: Slice the Model for Printing
Use these slicer settings as a starting point:
| Setting | Value |
|---|---|
| Layer height | 0.2 mm |
| Infill | 100% or solid walls |
| Supports | None |
| Print orientation | Flat on the bed |
| Nozzle | 0.4 mm |
Printing slowly improves edge quality.
Step 6: Print and Inspect
After printing:
- Inspect the cutting edge for defects
- Remove stringing carefully
- Lightly sand rough spots if needed
Avoid sanding the cutting edge too much — sharpness matters.
Real Examples of 3D Printed Cookie Cutters
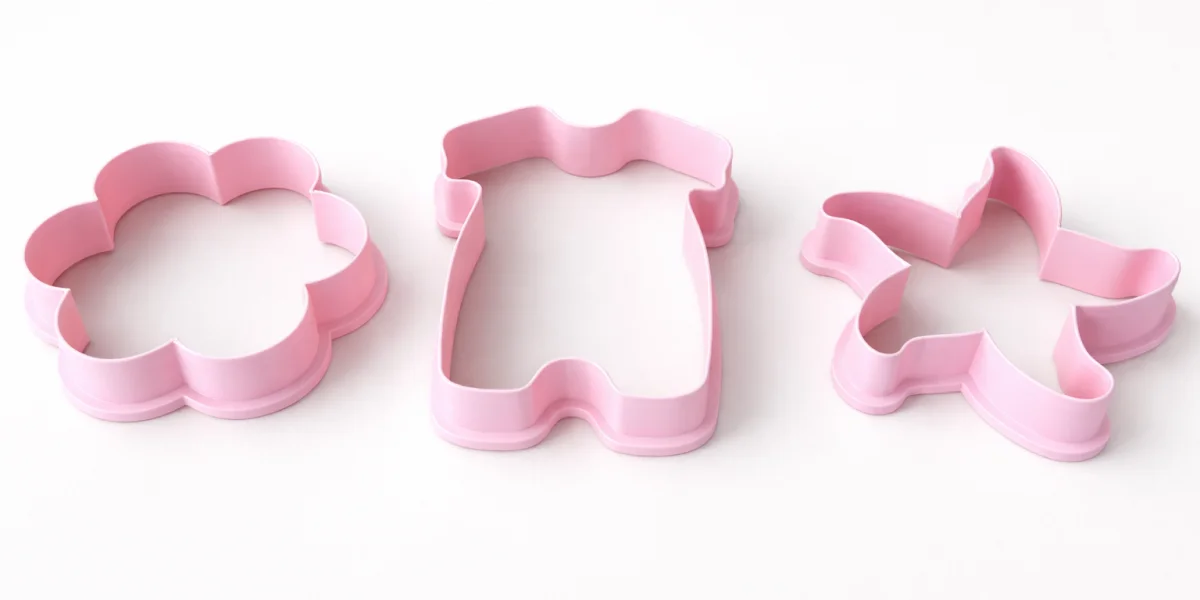
These examples show:
- Proper wall thickness
- Reinforced top edges
- Clean cutting profiles
Cleaning and Storage
- Wash by hand using warm (not hot) water
- Use mild soap only
- Do not use a dishwasher
- Store flat to avoid warping
Common Mistakes to Avoid
- Using open or broken outlines
- Designing walls thinner than your nozzle size
- Making cutters too tall
- Printing with unsuitable filament
Why Use GenShapr for Cookie Cutters?
GenShapr is built specifically for turning flat shapes into ready-to-print designs:
- Image-to-cutter conversion in seconds
- Automatic wall and edge generation
- Live 3D preview with real dimensions
- No CAD experience required
Ready to Make Your Cookie Cutter?
Turn any image into a custom cookie cutter in minutes.
Start Creating